There are many ways of using pro markers but the way that I colour is starting with my darkest colour and working up to the lightest colour.Here is an example of how I colour step by step.
For this tutorial I am using The Greetings Farm's Flirty Anya stamp. I am using her mainly as she has a lot of bold lines and I am hoping that this will make the tutorial easier to follow as well as the fact that I do love the cute Greetings farm stamps.
I have used the following pro and flex markers:
Hair: Umber, Burnt Umber, Cinnamon and Sandstone
Skin: Pastel Pink, Saffron, Vanilla and Ivory
Shoes: Umber and Burnt Umber
Flower and dress: Apricot, Yellow and Pale citrus (flex)
I am going to start with her hair. I like to try and give hair a bit of texture by colouring in little lines following the direction of the hair. I have started with Umber and just added it to the areas where I think there will be some shadow.
Then step 2 is with Burnt Umber and I go over the bits I have just coloured in Umber and make the lines a bit bigger again I am using little lines so the edges are not straight but have a bit of a more natural shape to them.
Step 3 is colour 3 in the list Cinnamon and I do the same again colour over the top of the bits I have already coloured and make them go a bit further towards the centre again. As you go over the previous colours they will start to blend a bit the more you go over them the blended they will become so you can do it to your tastes.
The last step for her hair that I have done is using sand stone to go over it all again and I have left just a tiny gap of the white showing through to give her hair a real highlight but you could go all the way and make the sections meet up if you want to. I use the lightest colour to blend it all into the colours I like. It is important to go over all the hair with the lighter colours as they will change the colours slightly of the darker pens you have used and if there are areas you don't go over it can look like it is a completely different colour to the rest of the hair.
Then I have moved onto her dress and the flower in her hair.
I think the darkest parts of the flower are going to be at the centre of the petals so I have used Apricot there.
Next I have used the Yellow to go over the areas coloured in apricot and go closer to the edges
Then to finish it I have gone over the whole flower with a Pale citrus flex marker.
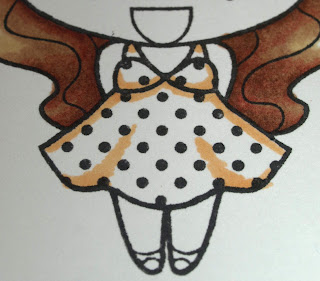
I have used the same colours in the same way for the dress. For this sort of area where I want the colour to look a bit flatter I colour moving my pen in tiny circles as it does not leave and lines and blends the colours nicely.
So first down is Apricot
Then over the top with yellow
And lastly go over the whole area with Pale citrus flex marker
Now it is time for the skin. I have started by giving her cheeks a bit of a pink glow with Pastel pink
Then I move onto Saffron just round the edges of her face, over the cheeks, under her face on the sides of her legs and insides of her arms.
Now we are almost there with the vanilla I colour in most of the rest of her skin leaving just the parts I think will be in the most light
Again for her skin I have coloured all the steps in using my pen in circles. and now I go over the whole skin area with Ivory to blend it all together fully
Now it is just her shoes to go and I have used just 2 colours as it is such a small area. I have started with the Umber and left a tiny spot in the centre of the toe for a bit of shine
Then gone over it with the Burnt Umber
And here is what the finished image looks like
Now you should be able to use any of the colour combo's on this blog all you need to do is start with the first one in the list and use it for the darkest parts of the image and then build from there.
If you have any questions please ask away :D
Hugs
Amy xx


